Assembling the Amplifier
Stage 0: Preparing the Protoboard
Par: 10 minutes
This tutorial centers on the Radio Shack 276-0150 prototyping board and its various clones. Although Radio Shack is out of the retail electronics business now, there are many places to mail order the exact board, an exact clone, or a close-enough alternative, so it remains the standard for this tutorial. Because the same essential prototyping board design is now available from more than one source, I will simply refer to this prototyping board design as the standard board type below.
Some of these alternative board designs are merely close-enough, rather than exact clones. You will have to make adjustments in that case.
The standard board type will fit into many typical headphone amplifier enclosures as-is, and into even more if you cut it in half.
I’ve done the hard work of figuring out a good, tight layout (PDF, 158 KB) on a half piece of the standard prototyping board design. Please download it now for reference, unless you are using some other board type. All you have to do is follow my instructions. :).
The standard board design has 25 rows. Simply score right down the middle of the 13th row a few times on each side of the board with an X-acto knife, then snap the board in two. I like to use the edge of a desk for this. You will have 12 usable rows on each half, and although you can cram it even tighter, my layout uses all 12. This allows you to use larger capacitors than a maximally-tight layout.
If you’re using some other protoboard type, you’re on your own to come up with a layout from the schematic (PDF, 4 KB). If you can’t read a schematic, this is a good project to learn from. The CMoy pocket amp circuit isn’t complicated, so it will provide a gentle introduction.
If you’re using the standard prototyping board design, solder the jumpers to the board as indicated in the layout diagram, linked above, and supplementally pictured below.
(If you’ve never seen this type of protoboard before, the white markings tell you where copper is on the bottom side. The jumpers connect one "pad" of copper to another. We don’t show the bottom side often in the following pictures because there’s no trickery going on here: if a lead goes through a given hole, that’s because it’s soldered right at that point.)
The jumpers are just trimmed component leads I kept from previous projects. You could clip some of your caps’ and resistor’s legs early to get started. Later on, you’ll have all the lead trimmings you’ll ever need. :)
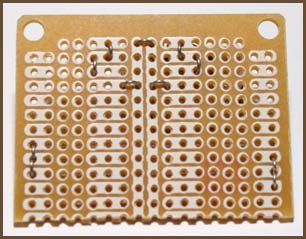
|
| (Click image to get larger annotated version.) |
Notice the jumpers near the bottom corners of the board. These “M-jumpers” tie three pads together into one big pad. They’re made from a resistor lead clipping, preferably a rather thin one, folded over in half with pliers, and with the ends bowed over. Like this:
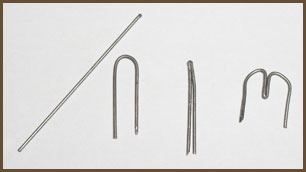
|
Others have used “S-jumpers” instead: the wire goes through the middle hole and one end is bent up to go through one hole, and the other is bent down to go through the other hole. This avoids the difficulty of stuffing a double thickness of wire into the middle protoboard hole, at the expense of not being as clear what’s going on when looking at the top of the board.
Stage 1: The Power Supply
Par: 1 hour
The power supply is the easiest section of the circuit to build, and it’s also easy to test, so I always do it first when I’m doing DIY amps from scratch.
Solder the caps in first, and use them to orient everything else. Make sure you put the legs in the right holes — the jumpers you added to the board per the instructions in the previous section dictate the path of current flow, so now that the jumpers are in place there’s no room for “creativity.” Also note that the electrolytic capacitors in the parts list are polarized: they have a negative and a positive leg, and you must orient them on the board properly. If one leg is shorter than the other, the short one is the negative leg. Also, there should be a clear marking on one side of the capacitor indicating the negative lead. In the pictures above, it’s the light stripe on the dark-colored cap body. You may find it helpful to study the power supply section in the schematic to see how to orient the caps.
The orientation of the LED also matters. As with the capacitors, the short leg goes towards the negative side of the power supply.
The LED’s current-limiting resistor (RLED) can go in any of several places. The only thing that matters is that it is inline with one of the LED’s leads; it doesn’t matter which one. Some examples:
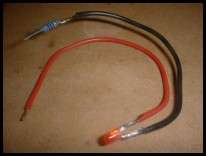
|
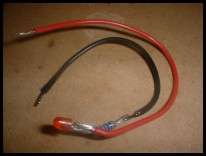
|
I tend to choose the RLED location based on where the most flexing will occur when you open and close the case: you want the most-flexed end to be the one away from the resistor because the resistor’s legs will snap if flexed too much. For mint tin type cases with the LED mounted in the lid, the resistor should be down on the board. For cases where the LED is on a side panel, it’s probably better to solder the resistor to the LED, since the end near the board will be flexed more. Before I solder it down, I put some heat-shrink tubing over the solder joint and the resistor to act as insulation and a strain relief.
Once all the components are in place, solder two 2" hookup wires to the board, in the holes marked V+ and V- in the annotated image. You should do this on the underside of the board. For the moment, just leave the other ends dangling loose, but don’t let them touch while the power is applied.
Now figure a temporary way to apply power to the board. You can solder a 9 V battery clip’s leads into the holes marked “batt.” in the annoated image, for example. This will only be used until you start modifying the enclosure.
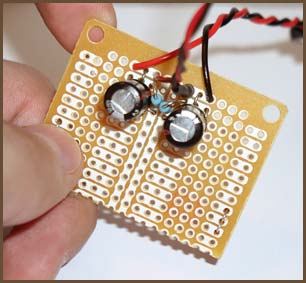
|
Test: Set your meter to DC volts, apply power to the board, and measure from the virtual ground (marked “gnd.” in the images) to the hookup wires going to the V+ and V- holes. If you’re using a single 9 V battery as your supply (recommended for testing), you should see a positive DC voltage at one cap and a negative voltage at the other cap, and their magnitudes should be nearly identical. For example, if you’re using a 9 V battery that’s been depleted to 8 V, you should see almost exactly +4 VDC and -4 VDC. If you’re off by more than a tenth of a volt or so, you did something wrong in hooking the circuit up. The most common mistake is a solder bridge, which usually causes the full input voltage (8 V in our example) to appear on one side of the power supply and 0 volts to appear on the other side. Fix any problems before continuing.
Also, make sure you get a positive reading between the V+ hookup wire and ground and a negative reading between V- and ground. If not, something is reversed. You can either leave it like it is and just run the wires differently when hooking the power up to the op-amp, or you can find and fix the problem. (This only applies if you’re using a digital meter, and you hook its black probe to the “gnd.” point for both tests. Analog meters generally can’t show negative readings, so you end up hooking the red lead to gnd. and the black to V- for that test.)
Unplug the power supply before continuing.
Stage 2: Adding the Amplification (Signal) Section
Par: 1.5 hours
First, solder the IC socket to the board with the notch away from the power supply. Use the placed socket to help you see where the other parts should go. (If you’re not using a socket, don’t solder the IC to the board yet — you risk damaging it while handling the board as you add all the other components. Leave the IC for last, if you go this route.)
Next, add all the resistors. Notice in the picture above that I used jumpers in place of R5; you should only put resistance in R5’s place if you have noise problems, as discussed elsewhere in this tutorial. For the remaining resistors, I add them in matched pairs: for each resistor in the left channel, I use my ohmmeter to find another that measures as close to identical as possible for the right channel. I haven’t scientifically studied whether this really helps, but it’s easy and quick, so why not do it? It’s one less thing to blame if the final product’s sound has obvious flaws.
Now add the input capacitors (C2). These aren’t polar like the power supply caps: you can orient them any way you like. Axial capacitors like the ones shown in the picture above are ideal for flexibility reasons, but most any capacitor can be made to work with a bit of creative lead bending.
If your board doesn’t use an IC socket, you can solder your op-amp to the board now. Remember to solder it with the notch away from the power supply.
Next, take the hookup wires going to the V+ and V- points on the power supply and run them to the V- and V+ points of the op-amp — pins 4 and 8. I recommend you do this on the bottom side of the board, since you’ll be adding a bunch of wires that have to be on the top of the board later. The more wires you can put on the bottom, the cleaner the top side of the finished amp will be, which facilitates later repairs and tweaks.
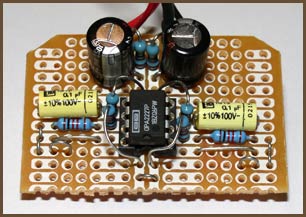
|
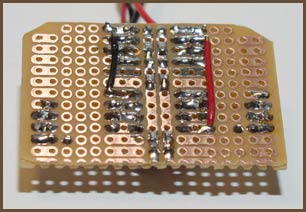
|
| (Click image for larger annotated version.) |
Finally, add the test points: I use lead clippings bent over in a “U” shape to provide something for aligator clips to grab onto. These are temporary, used only for the following test.
Test: If you are using a socket for the op-amp, put the op-amp chip into the socket now. Orient the notch on the chip with the notch on the socket. Now you’re ready to see if you have an amplifier yet or not!
Apply power to the board, and let the board sit a bit. Then, carefully touch the op-amp and all the resistors’ bodies, to make sure nothing is overheating. You shouldn’t get any heat at all; if you do, unplug the power and find out what’s going wrong.
I use a portable CD or MP3 player for testing, since they have volume controls. (Henceforth, this is our “source.”) That’s useful while you test without a volume control in the circuit. Turn the volume all the way down, and start it playing.
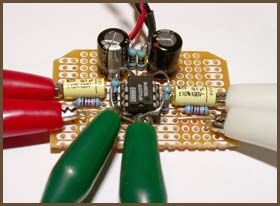
|
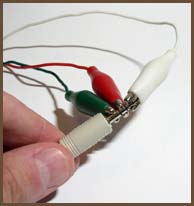
|
Now you have to hook the source into the circuit. There is no one right way to do it, but here’s one way I’ve done it: First, get 6 alligator jumpers and a mini-to-mini cable together. Plug the cable into the source’s headphone out, and hook three of the jumpers to the other end of the cable: the tip is the left channel, the ring is the right channel, and the long remainder of the plug is the ground. Hook the other ends of the jumpers to the board: the left and right channel jumpers go to the end of C2 nearest the board edge, and the ground can be hooked onto the R2 leads going to ground.
Next, do something similar with the remaining 3 alligator jumpers to tie a pair of cheap headphones to the amp’s output. Don’t use your nice $200 cans for first tests — if you’ve hooked something up wrong, you can blow your cans’ drivers out.
With the headphones sitting on the table, slowly turn up the volume on the player until you can hear some sound out of the headphones. Put them on now, and adjust the volume. If you get good sound, you’re done! You might listen for a while longer and try to stress the amp a bit, but basically you’ve mananaged to hook the amp up right the first try. Once you’re satisfied that the amp circuit is behaving properly, attach your good headphones to the amp and try that, too. Sometimes efficient cheapie phones will work fine but big audiophile headphones cause the amp to misbehave because they present a tougher load.
If the amp isn’t working right, you can get several different symptoms. Sometimes you’ll hear nothing at all, or the sound will be very faint and hollow or scratchy even with the source turned all the way up, or it will distort badly. Other times, it will sound fine at very low volumes, but when you turn your source up or the music hits peaks the amp will have ugly distortions. Sometimes the amp will play for a short while after power is applied, but the op-amp will quickly shut down. (Virtually all op-amps have power-protection circuitry in them, and various wiring faults can cause this to trigger.)
Troubleshooting is difficult, and I’m not going to try and get into the subject deeply here. The main things to check are that all the connections to ground are solid and that you don’t have signals or power going to ground when they shouldn’t. Use your meter to check your connections; sometimes you can have a connection that looks right, but if you get a high resistance through it, it needs to be re-done.
If your wiring is correct, and you’re only using a single 9 V battery, try adding a second battery in series temporarily with the first. If that cleans the sound up, you can either keep on using extra voltage, or you can try and improve your implementation so the extra battery isn’t needed.
There is additional advice in the companion article Basic Troubleshooting for Headphone Amplifiers.
If you can’t figure the problem out yourself, first do a search in the Head-Fi forum archives to see if you can find posts from others who’ve had that problem. Failing that, ask for help in the DIY forum at either site; be sure to mention details of the problem and what you’ve done to try and fix it.
Stage 3: Setting Up the Enclosure
Par: 2 hours
Now that the amplifier board is built and tested, you can use it to help you decide where on the enclosure’s panels you want to put the volume control, power switch, LED and I/O jacks. (Collectively, the “panel components.”) If you put the panel components close to where they hook up on the board, you can minimize the tangle of hookup wire in the case.
Now that you know where you want to put each panel component, drill the necessary holes and set the thing up “dry” — that is, with the board in the case and the panel components fastened to the panels but not connected to the board. This helps ensure that everything’s going to fit and work right before you start soldering wires between the panel components and the board.
If you’re using a metal enclosure like a mint tin and won’t be adding any kind of standoffs, you should insulate the bottom of the enclosure so that the exposed connections on the bottom side of the board don’t short out the circuit. This is especially likely in a mint tin.
You may be tempted to use electrical tape, but if the circuit can be pushed into the case bottom by squeezing the enclosure, as with a mint tin, the clipped-off component leads will cut through several layers of tape and still short the circuit out. You can knock those sharp edges off by placing a sheet of sandpaper on a flat surface and running the circuit board’s bottom across it a few times.
Another plan is to line the bottom of the enclosure with a sheet of plastic or heavy paper that is thick enough to avoid being punctured. I’d guess it would need to be at least 20 mils (0.5 mm) thick. I’ve successfully used Teflon sheets in the past. Others have been successful with poster board and other heavy paper types; a section cut out of a discarded food box should work, if you put the unprinted side towards the circuit board.
Stage 4: Wiring Up the Panel Components
Par: A bit over 1 hour
If you don’t already know how to hook up jacks and pots, you should read my How to Wire Panel Components article before proceeding. The main trick to hooking up panel components is figuring out which solder lug connects to what signal. The article will walk you through methods for determining the “pinout” of your panel components. Between that and the fourth diagram in the layout PDF, you should have no trouble figuring out how to hook these parts to the amp board.
The input and output jacks and the volume control have ground lugs that need to be connected to virtual ground in the amp circuit. That’s one reason I used the big long bus on the standard board design as ground: so you’d have a lot of holes to choose from when wiring up the panel components.
The most important thing when wiring the panel components into the circuit is to do them one at a time and then re-test the circuit. If you try and add all the components into the circuit at once and you have a problem, your troubleshooting job becomes very difficult. The second most important thing is to test each panel component hanging out in the air, and then again after it’s fastened into place. This checks for weak wires, bad chassis grounding technique, and other things. I’ve built a few amps that worked fine when the panel components were flopping about on the ends of their hookup wires, but initially failed when the amp was battened down within its case.
The first panel components I hook up are the LED and the power switch. Once both of those are working right, I add the input jack and test it; then I do the output jack and test that. Finally, I add the pot between the input jack and the input to the amp circuit. Naturally, this works best if you’ve made the wires from the input jack to the board extra long so that you can just cut the wire and splice the pot into the break.
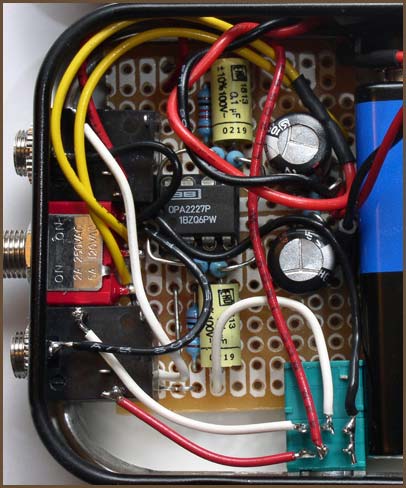
|
The basic flow is that the signal goes to the input jack (bottom, in the image above), to the input lugs on the potentiometer, out the wiper lugs, to C2 on the board, through the amp, and to the output jack.
The potentiometer is an ALPS RK097, and the jacks are the Switchcrafts in the parts list. I’m not using the SPST switch lugs on the ALPS pot simply to avoid tying this tutorial to that pot. If you do happen to use that pot, I do recommend using its switch instead of adding a separate one, as it will keep the panel layout cleaner.
Stage 5: Celebration
Par: As long as you want to take!
That’s it, you’ve now got an amp!
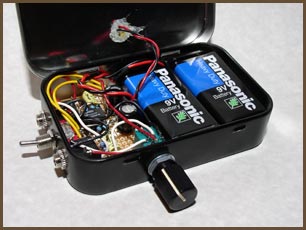
|
The next section has some things you might want to consider doing next.