Step-by-Step Assembly Guide
Before starting on your board, you may want to read through the Theory of Operation first, as it may influence the way you set up your board.
1. Add the resistors and diodes

|
Add the parts you need based on whether you're making a fast or trickle-only charging circuit. (See the schematic, the Part Selection Guide, and the Configuration Calculator.)
2. Add the charge controller (optional)
|
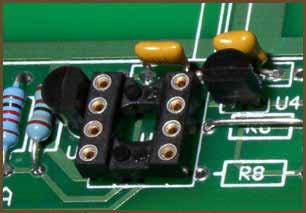
If you're making a fast-charging circuit, add a socket for the regulator, and add its bypass capacitors (C2 and C3). If your charging voltage will be over 20V, add the TLE2426es as well.
Leave the charge controller chip out until you're ready to fire the board up for the first time.
3. Add the fuse clips and power connector (optional)
|
These two bits of hardware are optional, but I highly recommend them.
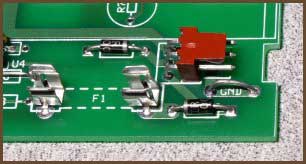
If you will be using a fuse, add the fuse clips now, but leave the fuse out for the moment. If you don't want to use a fuse, don't jumper across F1 just yet.
If you're not going to use a power connector, you can solder wires to the power pads now. In the picture above, the top pad is V- ("ground" within the charging circuit), the middle is B+ (output power from the batteries) and the bottom pad is V+ (input power from the wall supply).
4. Add the battery holders
|
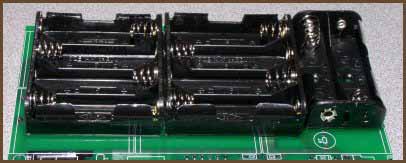
| 10× AA in two 4-cell holders and one 2-cell holder |
|
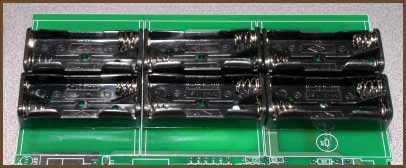
| 12× AAA in six 2-cell holders |
The board has two independent battery interconnection paths: one for AAA holders, and one for AA holders. The silkscreen lines on the board show where the AAA holders go. The AA positions aren't outlined to avoid confusion with the AAA lines, but you can figure out where the holders go by studying the upper picture above.
Your first task is to decide whether you're going to use AA or AAA cells, and then how many you're going to use. You can use up to 18 AAA cells in a 6 × 3 arrangement, or 10 AA cells in a 2 × 4 plus 2 arrangement. You must jumper any unused positions. Be sure not to jumper any AA positions if you're using AAAs or vice versa!
Take some time to think through what battery holder arrangement makes the most sense in your situation before ordering battery holders. The 12× AAA configuration pictured above is a good example: you could get the same cell count with four 3-cell holders, but the 2 × 6 configuration allows more space between the holders and the upper board edge. Six 2-cell holders are more expensive than four 3-cell holders, but if you need the extra space along that upper edge, the extra cost is well worth it. Remember to jumper across any unused positions on the board.
|
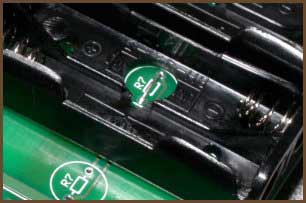
If you're making a fast-charger, you need to pick one of the R7 positions and ensure that you have access to it after the battery holders are placed. Keystone 3×AAA holders have small mounting holes over the R7 positions, so you simply have to drill one of these holes out to 5/16" or 3/8". With other holders, you'll have to drill a new hole in the holder to allow access to the inward R7. If you're using temperature-based backup fast-charge termination, R7 will be a thermistor, and it should be placed directly under one of the cells in the battery pack. If you're using time-based backup fast-charge termination, you can use whichever R7 is more convenient.
There's a danger that the mass of the cells could crack the solder joints, especially if you use the amp portably or if the battery holders are hanging downward from the board. I recommend using fast-curing epoxy to glue the holders to the board. This is very strong stuff, and it cures slowly enough that you have time to adjust the position of the holders, yet not so slowly that you have to hold the holders in place for a long time after you've got the positions right. If you're going to be using a Hammond 1455N16 case, I recommend sliding the board into your case while the epoxy cures, to ensure that the holder alignment allows the board to slide in and out freely. Once the epoxy cures, the holders will be nearly impossible to (re)move.
5. Add the LED stuff (optional)Add the LED and RLED, if you want a charge indicator.
RLED should span from the hole nearest the battery holder to the hole in the far corner of the board. (The nearer hole is for use with Q1, but Q1 shouldn't be used, so...) See the picture below.
You have two positions for the LED: centered on the board's short side, or off to the side. Put it wherever it's closest to where you will want it on the panel. If you will be centering it on the panel below the amp board's power LED, you can use a nibbler or a Dremel tool to cut a notch in the PPA amp board to give a slot for the battery board's charge indicator LED. This is why the battery board's LED is 300 mils from the front of the board and the amp board has a set of holes 400 mils from the front; you'd cut the notch only 300 mils deep, leaving the rear set of LED holes on the amp board intact.
6. Add the regulator
|
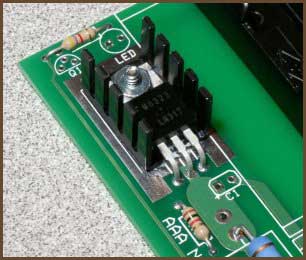
If you're going to put the battery board in the same case as the PPA board with the two boards' bottom sides facing each other, you need to use a flat-head machine screw to mount the regulator to the board. Countersink the hole so that the screw head doesn't short across the stubble on the bottom of the amp board.
The on-board heat sink may be sufficient for your purposes, but I recommend that you temporarily put an extra heat sink under the regulator, then solder the regulator down, and slide the heat sink out and screw the regulator down. The regulator's leads will bend a bit to take up the space for the extra heat sink, but you can bend them back to slide the heat sink back in if you decide you want it later.
Be sure to use heat sink compound with the regulator, no matter what the heat sink configuration is. Tighten the mounting screw to squeeze as much of the heat sink compound out of the joint as you reasonably can.
7. Add the cells and check voltage
Put the cells in the holders.
If you have a trickle-charging setup, simply ensure that the output voltage (V- to B+) is about what you expect.
If you have a fast-charging setup, check the voltage at the R4/R5 node relative to V-:
| Voltage | Diagnosis |
|---|---|
| At or near 0V | Cells seated properly in holders? Unused BH positions jumpered? |
| Well below 1.0V | Divider value is too high. |
| Near 1.0V | Cells discharged. Charger should bring this voltage above 1.0V quickly. If not, cells may be dead. |
| Around 1.5V | Normal, if the batteries were charged in the past month or so and are still unused. |
| Around 1.8V | Okay if the cells were very recently charged. Otherwise, divider value is probably too low. |
| Near 2.0V or above | Divider value is too low. |
8. Apply power and test
Put the charge controller chip in the socket if you're using it, then put an ammeter across the F1 position and apply power to the board. (Input V+ goes to the power pin closest to the fuse, and V- to the one farthest from it.) Use the high-amps scale on your meter at first, in case something isn't set up right.
If you're making a trickle charger, the LED should come on if you have added it, and the current to the board should be about what you expected when you calculated R2.
If you're making a fast-charger, the LED should be flashing steadily, indicating that it's fast-charging. If the LED is on steadily and the voltage at the R4/R5 node is below 1.0V, your cells are depressed or the divider value is too high. If the cells are depressed but not damaged, the trickle charger will bring them up until the voltage at the divider rises above 1.0V, allowing fast charging to start.
Once the LED is flashing, the current drawn by the board should be about what you expected when you calculated R2. Monitor the charging for the first few times, to ensure that when the fast charging cuts off, the voltage at the divider is below 2.0V, but not too far below. You want a little bit of headroom here to account for anomalous situations, but not too much. The rule is, if the voltage at the divider rises above 2.0V, you want it to be because there's a problem with the battery pack, not because the divider value isn't properly set.
After the board has been in fast-charging mode for a few minutes, touch your finger to the regulator. If you can't leave your finger on it for more than a second, you need to add a heat sink. If you have a heat sink on it and it's still too hot, your charging current is too high for the voltage drop across the regulator; either find a way to drop the power supply voltage a bit, or increase your R2 value to reduce the charge current.
Once the regulator's heat is under control, check that R2 is cool enough as well. If it's too hot, move up to a higher wattage type or use a higher resistor value to bring the charge current down.
If you have a way of measuring U1 and R2's temperatures, a good value to shoot for is 60°C or less. This is far below the thermal limit of most components you will use, but heat shortens component lifetimes, and the heat is going to be higher when the amp is all cased up. I like to get the temperature down to 45°C if I can.
9. Finish up
Put the fuse in if you're using it, or jumper across F1 otherwise.
For fast chargers, set up your backup fast-charge termination now. (R6-R8) Don't fall prey to the temptation of leaving R6-R8 unpopulated. Your charger may work fine without them at first, but as the cells get old, they will start misbehaving, so you need some way of turning off fast charging if something goes wrong.